The initial setup for Google Account and payment methods is described here.
You can initiate commercial payments on behalf of your merchants using Google Pay on your frontend. Currently, this flow is for web-based platforms only. If you plan to build a mobile app, please mention it to your account manager.
If you plan to integrate top-up with Google Pay, please refer to this page (the set up is different).
Google Pay commercial payments are settled after 3 days of payment initiation.
Flow:
Integration can be split into two parts – wallet validation together with payment sheet creation and payment initiation.
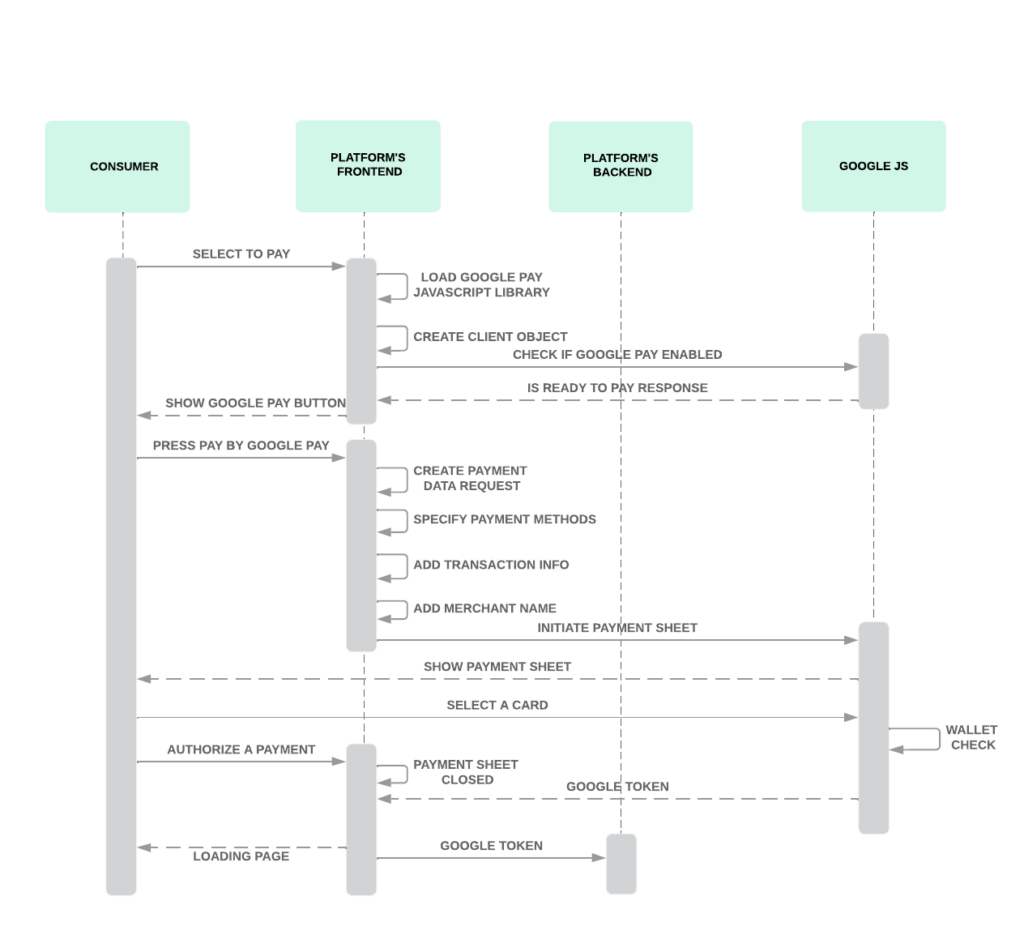
- When your end-user selects to pay by Google Pay, you will need to load the Google Pay API JS Library in your frontend. Sample below:
<script
  async
  src="https://pay.google.com/gp/p/js/pay.js"
  onload="console.log('TODO: add onload function')">
</script>- After the Google Pay API JavaScript library loads, initialize a
PaymentsClientobject. InmerchantInfoadd your merchant name registered in Google and merchant ID received (in a non-prod environment it’s any string between 12 and 18 symbols) after production access is approved. In a non-prod environment dummy payment methods are returned that are suitable to reference the structure of a payment response. In this environment, a selected payment method isn’t capable of a transaction. Please see the sample below:
const paymentsClient =
    new google.payments.api.PaymentsClient({{
  environment: "TEST",
  merchantInfo: {
    merchantName: "Example Merchant",
    merchantId: "12345678901234567890"
  },});
Tip! Google recommends only initializing paymentsClient once. Use the same instance when you invoke all of the other APIs, like CreateButton, IsReadyToPay, PrefetchPaymentData, and LoadPaymentData.
- Then, you’ll need to call
isReadyToPay()to determine if the Google Pay API is supported by the current device and browser for your specified payment methods. Add the payment methods you allow to your base request object. IntokenizationSpecificationadd:
"tokenizationSpecification": {
"type": "PAYMENT_GATEWAY",
"parameters": {
"gateway": "checkoutltd",
"gatewayMerchantId": "pk_gvvpjipxznauq67fhtegsnao7q#"
}
At ConnectPay, we support both VISA and MASTERCARD. See the following code sample:
const baseRequest = {
    apiVersion: 2,
    apiVersionMinor: 0,
};
const allowedCardNetworks = ['MASTERCARD', 'VISA'];
const allowedCardAuthMethods = ['PAN_ONLY','CRYPTOGRAM_3DS'];
const baseCardPaymentMethod = {
    type: 'CARD',
    parameters: {
        allowedAuthMethods: allowedCardAuthMethods,
        allowedCardNetworks: allowedCardNetworks,
        assuranceDetailsRequired: true,
    },
    tokenizationSpecification: {
        type: 'PAYMENT_GATEWAY',
        parameters: {
            gateway: example,
            gatewayMerchantId: exampleGatewayMerchantId
        }
    }
};
const isReadyToPayRequest = Object.assign({}, baseRequest);isReadyToPayRequest.allowedPaymentMethods = [baseCardPaymentMethod];paymentsClient.isReadyToPay(isReadyToPayRequest)
.then(function(response) {
if (response.result) {
// add a Google Pay payment button
}
})
.catch(function(err) {
// show error in developer console for debugging
console.error(err);
});- Add a Google Pay payment button to your page. For more information about available button types, colors, and display requirements, see Google Brand guidelines. Google is strict in following their guidelines, please pay attention to it. Incorrect interpretation for branding might cause top-up feature restrictions.
- Then
PaymentDataRequestshould be created. To create aPaymentDataRequestobject, complete the following steps:
- Build a JavaScript object that describes your site’s support for the Google Pay API. For a full list of supported properties, see the PaymentDataRequest structure in Google documentation. You can decide whether you use both
authMethodsor only one. We recommend you support both to suggest this feature to more users.PAN_ONLY: This authentication method is associated with payment cards stored on file with the user’s Google Account. Returned payment data includes personal account number (PAN) with the expiration month and the expiration year. This method forces 3DS authorization, which we support.CRYPTOGRAM_3DS: This authentication method is associated with cards stored as Android device tokens. Returned payment data includes a 3-D Secure (3DS) cryptogram generated on the device.
See the following code sample:
const paymentDataRequest = Object.assign({}, baseRequest);- Add the payment methods supported by your app, such as any configuration of additional data that’s expected in the response. See the following code sample:
paymentDataRequest.allowedPaymentMethods = [cardPaymentMethod];- Define a total price and currency for a shopper to authorize. You must include the
countryCode,totalPrice, andmerchantNameparameters to meet SCA requirements. See the following code sample:
paymentDataRequest.transactionInfo = {
  totalPriceStatus: 'FINAL',
  totalPrice: '123.45',
  currencyCode: 'EUR',
  countryCode: 'LT'
};- Provide a user-visible merchant name, and use Google
TESTmerchantIdvalue when inTESTenvironment. See the following code sample of a user-visible merchant name:
paymentDataRequest.merchantInfo = {
  merchantName: 'Example Merchant'
  merchantId: '12345678901234567890'
};- Then payment sheet initialization should start. To register an event handler for user gestures, complete the following steps:
- Register a click event handler for the purchase button. The event handler calls
loadPaymentData()immediately after it interacts with the Google Pay, payment button. - After a Google user grants permission for your site to receive information about the user’s selected form of payment and optional contact data, handle the response from the Google Pay API.
- Extract the payment token from the
paymentDataresponse. You will be using gateway integration, pass this token to our Initiate Google Pay API without any modifications.
Note! In a TEST environment, a payment response includes summary data about the selected payment method that’s suitable for display on a confirmation page. The payment response doesn’t include a payment method that’s capable of a transaction.
paymentsClient.loadPaymentData(paymentDataRequest).then(function(paymentData){
  // if using gateway tokenization, pass this token without modification
  paymentToken = paymentData.paymentMethodData.tokenizationData.token;
}).catch(function(err){
  // show error in developer console for debugging
  console.error(err);
});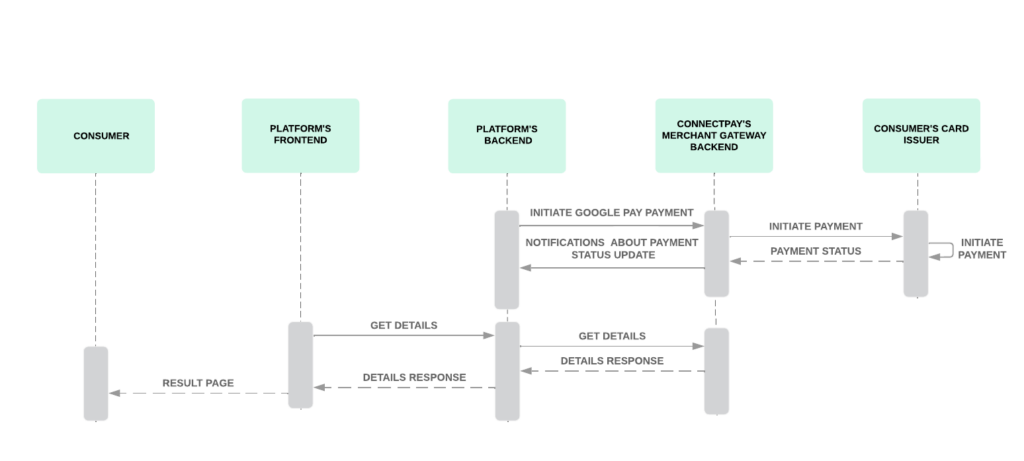
- When you send us the Initiate Google Pay API request and there is
CRYPTOGRAM_3DSselected asauthMethoda process is shorter. As Google takes liability shift here, end-user authorizes a payment in Android device using biometrics, everything happens on the same page and after we receive payment status update, we send you a notification about payment status change. Initiate Google Pay API returns payment ID as a response which you can map with payment status change notification response. More about notifications can be found here. - Notifications are optional, so if you don’t want to receive them, you can always call our Get payment details API to receive status on your own.
- After status is successful, you will need to show your end-user result page specifically mentioning that this payment was initiated by Google Pay method.
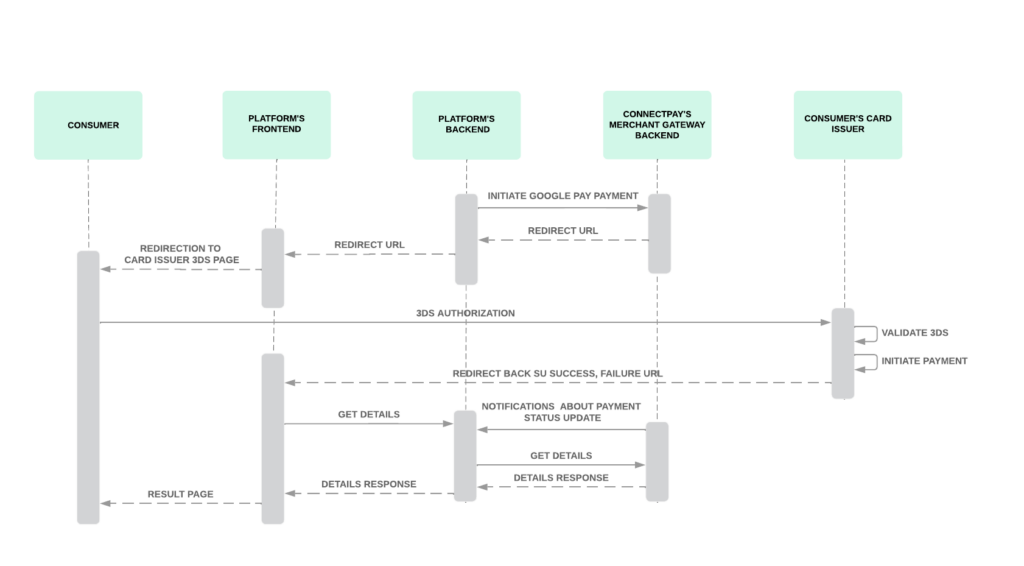
- When you send us the Initiate Google Pay API request and there is
PAN_ONLYselected asauthMethod, you will receiveredirectUrlin response. Redirect your end-user to that URL, there they will perform 3DS authorization. - After 3DS authorization, based on the result we will redirect your user back to
successUrlorfailureUrlprovided by you in Initiate Google Pay API request. For security reasons those URLs should be saved to your devApp too. - After redirection, the process is the same as with
CRYPTOGRAM_3DSflow – we can send you status change notifications, or else you can call our Get payment details API instead.
Splitting one payment for multiple
sub-merchants
For BaaS partners, it is possible to send 1 Google Pay payment request on behalf of multiple merchants. This feature is used for marketplaces where end users can add multiple goods from different merchants through one platform’s website. One payment can have a maximum of 10 different merchants in payment requests. Configuration at Google side remains same as you’ve created, website where end-user is making a payment should be registered at Google. When sending the Initiate Google Pay API request, add an optional object splittingInstructions with brand IDs representing merchants user is paying for. You can add your own commission fee for each merchant.