

3. Card Lifecycle Management
TABLE OF CONTENTS
3.1. Cards Create Card Application
3.2. Multiple Card Designs and Formats
- Activate Card
- Card Delivery
3.4. Status Management: Freezing, Unfreezing, Blocking, and Closing Cards
3.6. Get Card Details Information
- Get BaaS Client Cards
- Get Card Details
- Get CVV2
- Get Card Number
- Disable/Enable Card Renewal Settings
- Update Card Delivery Address
- Replace Card
3.8. Google / Apple Push Provisioning
- Google Pay Push Provisioning
- Apple Pay Push Provisioning
Issuance & Application: The API flow for requesting a new card.
Cards Create card application
After these conditions are met:
- Full Customer Onboarding.
- Active Account: The end-user (either a Business or Private individual) must have an active, fully onboarded ConnectPay account.
- Sufficient Balance (If Applicable): Depending on your specific program setup, card issuance fees may apply and require sufficient balance on the linked account.
- KYC/KYB Verification: The user entity must have passed all required compliance checks.
Card applications can be submitted using the Create Card Application API. Card applications are processed according to the rules and validations described in the API documentation.
Request Example:
{
    "bankAccount": {
        "iban": "LT873740010000007419"
    },
    "embossing": {
        "firstName": "Eliza",
        "lastName": "Ponce"
    },
    "cardType": "ChipAndPin",
    "cardProduct": "ConnectPayDebit",
    "personalizationProductCode": "2435-1234",
    "person": {
        "phoneNo": 37066888777,
        "email": "[email protected]"
    },
    "deliveryAddress": {
        "addressLine1": "address1",
        "addressLine2": "address2",
        "postcode": "01100",
        "city": "Vilnius",
        "countryCode": "LT",
        "deliveryDispatchMethod": "Regular",
        "phoneNo": "37069198597"
    }
}
Parameter Description
| Parameter | Description |
| bankAccount.iban | IBAN of the account to which the card will be linked. |
| embossing.firstName | Cardholder first name used for card personalization. Maximum 12 characters. |
| embossing.lastName | Cardholder last name used for card personalization. Maximum 13 characters. |
| cardType | Card format. Use ChipAndPin for a physical card or Virtual for a virtual card. |
| cardProduct | Card program under which the card is issued. For ConnectPay programs, ConnectPayDebit or ConnectPayBusiness can be used. Dedicated White Label programs use the cardProduct value assigned to that specific program. |
| personalizationProductCode | Identifies the card personalization/design. Use this field when the card program contains multiple available designs. At least one default design must be configured for each applicable card type. If the field is omitted, the default personalization configured for the selected cardType and cardProduct is used. |
| person.phoneNo | Cardholder phone number. |
| person.email | Cardholder email address. |
| deliveryAddress.addressLine1 | Primary delivery address line. |
| deliveryAddress.addressLine2 | Additional delivery address information. |
| deliveryAddress.postcode | Delivery address postal code. |
| deliveryAddress.city | Delivery city. |
| deliveryAddress.countryCode | Delivery country code. |
| deliveryAddress.deliveryDispatchMethod | Card delivery method, for example Regular, according to the methods available for the configured card program. |
| deliveryAddress.phoneNo | Contact phone number used for card delivery. |
cardType and cardProduct represent separate card configuration parameters: cardType defines whether the card is physical or virtual, while cardProduct defines the card program configuration.
For exact field format, mandatory/optional rules, and supported enumerations, refer to the Create Card Application API specification.
Card creation is an asynchronous process. A successful response from the Create Card Application API confirms only that the application has been successfully received by ConnectPay. It does not confirm that the card has already been created.
The expected flow is:
1. Card application submitted
The Create Card Application API returns a successful response.
This means that the card application has been received and accepted for further processing. At this stage, the card may not yet exist in the card issuer’s system. But in response, a designated Card ID is provided; that will be used later for the newly created matching card.
{
  "applicationId": "A1234",
  "cardId": "a62e8b33-1866-4a97-b56d-9a5d2af0f54b"
}2. Card application status received
After the application has been processed, ConnectPay sends a BaaSCardApplication Status Changed webhook.
The application can receive one of the following final statuses:
BaaSCardApplication.ApprovedBaaSCardApplication.Declined
An Approved status confirms that the card application has passed the required validations and has been approved for card creation.
If the application status webhook has not yet been received, the application should still be considered in progress. A successful Create Card Application API response alone must not be treated as confirmation that the application has been approved.
Application processing may take additional time when further validation is required. For example, an application may be temporarily stopped for manual review if the difference between the embossed name and surname and the cardholder’s registered name exceeds the permitted threshold.
3. Card creation confirmed
After the application has been approved and the card has been created in the card issuer’s system, ConnectPay sends a Card Status Changed webhook.
Receiving the BaaSCardStatusChanged webhook is the confirmation that the card has been created.
The workflow can therefore be represented as:
Create Card Application API → Successful API response → BaaSCardApplication Status Changed → BaaSCardStatusChanged
A successful API response confirms application receipt.
BaaSCardApplication.Approved confirms application approval.
BaaSCardStatusChanged confirms card creation.
Card Type Differences
The card lifecycle after creation depends on the card type.
- Virtual Card — if successfully created, the card is activated immediately.
- ChipAndPin Card — after creation, the card progresses through additional lifecycle statuses, including personalization and dispatching, before it can be activated.
Multiple Card Designs and Formats
Cards can be configured with different visual designs for both physical and virtual card products.
For physical cards, the design can be either vertical or horizontal, depending on the selected card configuration.
Multiple card designs can also be configured within the same card program. This allows different visual variants to be offered, for example:
- different color schemes;
- different brand identities or sub-brands;
- different designs for specific customer segments or card products.
The configured design is also used for the corresponding virtual card representation, allowing the same branding and visual identity to be maintained across both physical and virtual card experiences.
The required card design and format are selected when the card is issued, based on the designs available for the card program.
Activation & Delivery
Activation & Delivery: Specific flows for physical card delivery addresses and activation.
Activate card
A card can be activated using the Activate Card API.
We recommend activating a physical card after it has been received by the cardholder.
Only cards with "cardType": "ChipAndPin" require activation. Cards with "cardType": "Virtual" are active by default and do not need to be activated separately.
To activate a card:
- The card
idis required. - The card MUST be in
Dispatchedstatus. - No additional card or cardholder details are required.
The activation request payload is empty:
{}Once the card is in Dispatched status, the card id and an empty request payload are sufficient to initiate activation.
The system does not require any data from the ChipAndPin card to be activated. It is imperative to security reasons to not activate the card automatically when it reaches the Dispatched Status. Only card holder should activate ChipAndPin card, when it is received and in his physical possession.
Card Delivery
Physical card issuance and delivery are supported only for customers and cardholders within the supported geographical area.
Eligibility for Physical Card Issuance
A physical card can be issued when at least one of the following conditions is met:
- Corporate: the customer is incorporated or resides in the EEA, United Kingdom, or Gibraltar; or
- Personal: the cardholder is a resident of the EEA, United Kingdom, or Gibraltar.
The exact supported country is validated when the Create Card Application API request is submitted. If the provided country is not supported for the applicable card product, the card application will be rejected.
Supported Delivery Countries
Card delivery is generally available across the EEA and the United Kingdom, subject to product-specific restrictions.
For the Business product, delivery is supported to the EEA, the United Kingdom, and Gibraltar.
For the Consumer product, delivery is supported to the EEA and the United Kingdom. Gibraltar is not currently included in the supported Consumer delivery countries.
Refer to the Create Card Application API for the applicable country validation and technical requirements.
Delivery Time
Card shipping time starts counting only after the card has been personalized (produced).
Card personalization normally takes approximately 1–2 working days. This processing time should therefore be considered separately from the estimated shipping time.
For example:
Card application approved → Card produced/personalized (usually 1–2 working days) → Card dispatched → Shipping time starts
Delivery Dispatch Method
The delivery method is selected when creating the card application using the deliveryDispatchMethod parameter.
Three delivery methods are available:
| Delivery method | Description |
|---|---|
| Not tracked | Standard delivery without shipment tracking. |
| Tracked | Delivery with shipment tracking. |
| Tracked Express | Expedited delivery with shipment tracking. |
Conceptually, the selected method is provided in the Create Card Application request as:
{
  "deliveryDispatchMethod": "<selected delivery method>"
}For example, select the corresponding API enum value for Not tracked, Tracked, or Tracked Express according to the Create Card Application API.
Note: Delivery availability and supported countries may differ depending on the card product. Country eligibility is validated by the Create Card Application API before the card application is accepted.
Status Management: Freezing, unfreezing, blocking, and closing cards
This section describes the card lifecycle statuses and the actions available to manage a card after it has been issued.
A card can move between different statuses either as a result of:
- actions initiated through the ConnectPay API;
- actions performed by the cardholder;
- ConnectPay system processes; or
- Card Issuer system processes.
The Card Status Flow Chart shows all supported card statuses and the possible transitions between them.
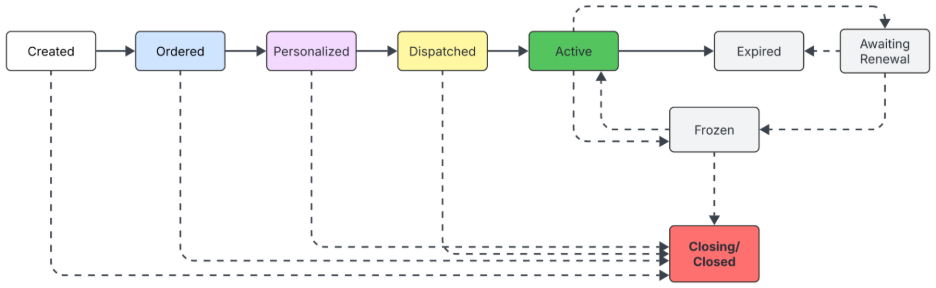
Developer tip: Not every transition shown in the Card Status Flow Chart can be initiated through an API. The chart represents the complete card lifecycle, including transitions initiated by the cardholder, ConnectPay, and the Card Issuer. API-supported transitions and their prerequisites are described in the relevant action sections below.
Virtual Card Exception
Virtual cards have a simplified lifecycle. The following statuses are not applicable to Virtual cards:
OrderedPersonalizedDispatched
Therefore, the corresponding Card Status Changed webhook events are not generated for Virtual cards.
Detailed descriptions of individual card statuses are available here:
| Card status | Applicable Card types | Description | Card Status Change Webhook event type |
|---|---|---|---|
Created | ChipAndPin, Virtual | A card is created in the system after the application is approved | BaaSCard.Created |
Ordered | ChipAndPin | Card is ordered in personalization center | BaaSCard.Ordered |
Personalized | ChipAndPin | The card is personalized in the personalization center | BaaSCard.Personalized |
Dispatched | ChipAndPin | The card was dispatched from the personalization center | BaaSCard.Dispatched |
Active | ChipAndPin, Virtual | The card is active and can be used for purchases | BaaSCard.Activated |
AwaitingRenewal | ChipAndPin, Virtual | This means that this card can be renewed (by creating a new card with specifying predecessor_card_id). The card will get this status N days before the expiration date. Currently, it is 30 days, so if the expiration date for the card is 12/24 – it will get this status 11/24, a month before the card can be used for purchases. | BaaSCard.AwaitingRenewal |
Blocked | ChipAndPin, Virtual | The card is frozen (a.k.a. soft-blocked) and can’t be used for purchases. Status is reversible, and the card can be unfrozen. | BaaSCard.Frozen |
Closed | ChipAndPin, Virtual | Hard block – termination. Final card status. Status is irreversible | BaaSCard.Closed |
Closing | ChipAndPin, Virtual | This means that there are pending authorizations and will be updated to “Terminated” after all authorizations are cleared. | BaaSCard.Closing |
Expired | ChipAndPin, Virtual | Card validity expired | BaaSCard.Expired |
A client’s cards and their current statuses can be retrieved using Get BaaS Client Cards with the corresponding BaaSClientId.
Action – Freeze Card
A card can be temporarily frozen using the Freeze Card API.
Freezing prevents the card from being used for purchases and other card transactions. It is a temporary and reversible action.
A card can be frozen only when its current status is Active.
The status transition is:
Active → Blocked
After a successful freeze operation:
- the card status becomes
Blocked; - the card cannot be used for transactions;
- the
BaaSCard.FrozenCard Status Changed webhook is generated.
The Blocked status represents a frozen card and is sometimes referred to as a soft block.
The same card can subsequently be returned to use through the Unfreeze Card API.
Action – Unfreeze Card
A previously frozen card can be restored using the Unfreeze Card API.
A card can be unfrozen only when its current status is Blocked (Frozen).
The status transition is:
Blocked → Active
After the card is successfully unfrozen, it becomes active again and can be used for transactions, subject to its configured limits and restrictions.
Unfreeze cannot be used for cards that have been permanently terminated or are in another lifecycle status.
Action – Terminate Card
A card can be permanently terminated using the Terminate Card API.
Termination is an irreversible action. Once the card has been terminated, it cannot be reactivated or unfrozen.
Before termination, the card MUST first be in Blocked (Frozen) status.
The expected flow is therefore:
Active → Freeze → Blocked → Terminate → Closing / Closed
Depending on whether there are pending authorizations, termination can result in one of two statuses:
Closing— termination has been initiated, but pending authorizations still need to be cleared.Closed— the card has been permanently terminated. This is the final card status.
If the card enters Closing, it will transition to Closed after the outstanding authorizations have been cleared.
Unlike freezing, termination cannot be undone.
API Action Summary
| Action | Required current status | Result | Reversible |
|---|---|---|---|
| Freeze | Active | Blocked | Yes |
| Unfreeze | Blocked | Active | Yes |
| Terminate | Blocked | Closing or Closed | No |
This also gives you a very clear API-management path in the documentation:
Active → Freeze → Blocked → Unfreeze → Active
or, for permanent closure:
Active → Freeze → Blocked → Terminate → Closing/Closed.
Card Limit Management
Updating Card Limit
Card limits can be changed using the Update card limits API.
The main limits categories are:
purchases– purchases in POSinternetPurchases– online purchasescontactlessPayments– contactless payments in POSwithdrawals– cash withdrawals from ATMoverallLimits– these limits override all above-mentioned limits. Other limits can’t be higher thanoverallLimitsavailableAmount– how much of the limits is still availableusedAmount– how much of the limit is already used
Each card program has golbal setting of Default and Max Values. These values are used for each new card creation and setting limits. These limits are agreed during integration stage.
Sample of one category limits
Contactless payments:
| Limit Type | Default | Maximum |
|---|---|---|
| Client Daly | 500 | 1000 |
| Card Daily | 500 | 1000 |
| Client Monthly | 1500 | 3000 |
| Card Monthly | 1500 | 3000 |
| Card Transaction Contactless limit | 200 | 500 |
Description
- Client Daly – This daily limit is set for one Company or for one person, and is divided between all created and active cards
- Client Monthly – This Monthly limit is set for one Company or for one person, and is divided between all created and active cards
- Card Daily – Limits single card daily usage, and is applicable for each Card. Total amount of one card, or of several cards can not breach Client Daly limit amount
- Card Monthly – Limits single card monthly usage, and is applicable for each Card. Total amount of one card, or of several cards can not breach Client Daly limit amount.
- Card Transaction – Limits single transaction amount.
Limit dependencies: Limits within the same transaction category must follow the period hierarchy: Transaction ≤ Daily ≤ Weekly ≤ Monthly. And Monthly Limits can not be more than Maximum limits.
Standard flow only allows to Update Cards Limis when card is in statuses:
| Card Status | Standard Flow Allowed | Notes |
|---|---|---|
| Created | Yes | |
| Ordered | Yes | |
| Personalised | Yes | Not applicable for Virtual cards |
| Dispatched | Yes | Not applicable for Virtual cards |
| Active | Yes | |
| Awaiting renewal | Yes | |
| Blocked | Yes | |
| Closing | No | |
| Closed | No | |
| Expired | No |
Standard white label card program setup with precondittions:
- Weekley limits are disabled for white label program
- Overall Limits are disabled for white label program
Virtual Limit Setup body
{
  "contactlessPayments": {
    "limits": {
      "daily": 10000.0,
      "monthly": 50000.0,
      "transaction": 10000.0
    }
  },
  "internetPurchases": {
    "limits": {
      "daily": 10000.0,
      "monthly": 50000.0,
      "transaction": 10000.0
    }
  },
  "withdrawals": null,
  "overallLimits": {},
  "purchases": {
    "limits": {
      "daily": 10000.0,
      "monthly": 40000.0,
      "transaction": 10000.0
    }
  }
}Standard ChipAndPin Limit Setup body
{
  "contactlessPayments": {
    "limits": {
      "daily": 10000.0,
      "monthly": 50000.0,
      "transaction": 10000.0
    }
  },
  "internetPurchases": {
    "limits": {
      "daily": 10000.0,
      "monthly": 50000.0,
      "transaction": 10000.0
    }
  },
  "withdrawals": {
    "limits": {
      "daily": 10000.0,
      "monthly": 50000.0,
      "transaction": 10000.0
    }
  },
  "overallLimits": {},
  "purchases": {
    "limits": {
      "daily": 10000.0,
      "monthly": 40000.0,
      "transaction": 10000.0
    }
  }
}Standart result of Update Card Limits allways returns all sections and all possible limit values. In API result, all 4 categories of limits are returned: “Daily”, “Weekely” “Monthly” and ‘Transaction”. As mentioned, If Weekley is disabled, then FOr weekley value Mothly value is used.
Specific Scenarios: Weekley limits case
If Weekley limits are decided to be used, then Weekley limits must be included in to the standard API body for each applicable section. (applicable for both Virtual and ChipAndPin). When Weekley limits are disabled for program level, Weekley limits INHERIT Mothly limits, that are beeing set to the card. Example:
"contactlessPayments": {
  "limits": {
    "daily": 10000.0,
    "weekley": 10000.0,
    "monthly": 50000.0,
    "transaction": 10000.0
}Specific Scenarios: Overall Limits case
In Case white label program has enabled Overall limits, then Overall limits must be expanded (applicable for both Virtual and ChipAndPin):
"overallLimits": {
  "limits": {
    "daily": 10.25,
    "weekly": 100.25,
    "monthly": 100.25
}Specific Scenarios: Payload example when Only sigle limit section needs to be updated, in example Contactless payments:
Virtual example
{
  "contactlessPayments": {
    "limits": {
      "daily": 10000.0,
      "monthly": 50000.0,
      "transaction": 10000.0
    }
  },
  "internetPurchases": {},
  "withdrawals": null,
  "overallLimits": {},
  "purchases": {}
}
Get Card Details Information
Get BaaS Client Cards
A complete list of cards associated with a client can be retrieved using the Get BaaS Client Cards API and the corresponding BaaSClientId.
The response provides an overview of the client’s cards, including information such as:
- Card ID
- Card status
- Card type
- Masked PAN
- Expiration date
- Card limits and available amounts
- Delivery information
- 3DS settings
- Cardholder embossing information
- Other card-related details
Use this API when you need to retrieve or display a list of cards belonging to a specific BaaS client.
Note: Confirm whether cards in final statuses, such as Closed and Expired, are always included in the response. This should be documented according to the actual API behaviour.
Standard flow only allows Get BaaS Client Cards API statuses:
| Card Status | Standard Flow Allowed | Notes |
|---|---|---|
| Created | Yes | |
| Ordered | Yes | |
| Personalised | Yes | Not applicable for Virtual cards |
| Dispatched | Yes | Not applicable for Virtual cards |
| Active | Yes | |
| Awaiting renewal | Yes | |
| Blocked | Yes | |
| Closing | Yes | |
| Closed | Yes | |
| Expired | Yes |
Get Card Details
Detailed information about a specific card can be retrieved using the Get Card Details API and the corresponding BaaSClientCardId.
Use this API when information about one specific card is required.
Difference from Get BaaS Client Cards
The response structure is largely the same as the individual card objects returned by Get BaaS Client Cards. However, the Get Card Details response provides additional transaction-level information within the card limits.
In particular, the single-card response additionally contains transaction values under:
availableAmountusedAmount
for the individual limit categories, as well as transaction-level values under overallLimits.
For example:
"availableAmount": {
  "daily": 10.12,
  "weekly": 11.11,
  "monthly": 12.55,
  "transaction": 10.12
}
The Get BaaS Client Cards response is therefore suitable for retrieving a card portfolio overview, while Get Card Details can be used when more detailed information about a particular card is required.
Developer note: In the current response examples,
cardIdis returned for each card by Get BaaS Client Cards, while it is not included in the Get Card Details response body because the card is already identified byBaaSClientCardIdin the request.
Standard flow allows to call this Get Card Details API in statuses:
| Card Status | Standard Flow Allowed | Notes |
|---|---|---|
| Created | Yes | |
| Ordered | Yes | |
| Personalised | Yes | Not applicable for Virtual cards |
| Dispatched | Yes | Not applicable for Virtual cards |
| Active | Yes | |
| Awaiting renewal | Yes | |
| Blocked | Yes | |
| Closing | No | |
| Closed (Terminated) | No | |
| Expired | Yes |
Get CVV2 (only Virtual) (For Both Types)
You can get the CVV2 value of the card using Get CVV2 API.
Description of encoded request preparation is the same as for Get Pin.
Standard flow allows to call this Get CVV2 API in statuses:
| Card Status | Standard Flow Allowed | Notes |
|---|---|---|
| Created | No | |
| Ordered | No | |
| Personalised | No | Not applicable for Virtual cards |
| Dispatched | No | Not applicable for Virtual cards |
| Active | Yes | |
| Awaiting renewal | Yes | |
| Blocked | Yes | |
| Closing | No | |
| Closed | No | |
| Expired | No |
Get Card number (only Virtual) (For Both Types)
You can get the full card number value using the Get Card number API.
Description of encoded request preparation is the same as for Get Pin.
Standard flow allows to call this Get Card number API in statuses:
| Card Status | Standard Flow Allowed | Notes |
|---|---|---|
| Created | No | |
| Ordered | No | |
| Personalised | No | Not applicable for Virtual cards |
| Dispatched | No | Not applicable for Virtual cards |
| Active | Yes | |
| Awaiting renewal | Yes | |
| Blocked | Yes | |
| Closing | No | |
| Closed | No | |
| Expired | No |
Renewals & Replacements
Renewals & Replacements: Clear rules on whether renewals are automatic or partner-triggered, and how to handle the overlap between old and new cards.
Disable/Enable card renewal settings
The Enable/Disable Card Renewal Settings API allows automatic card renewal to be enabled or disabled for an individual card.
The renewAutomatically setting does not trigger an immediate renewal. It is a stored card setting that determines whether the card should be renewed automatically when it reaches the applicable renewal period before its expiration date.
By default, newly created cards have automatic renewal enabled:
{
  "renewAutomatically": true
}If the cardholder does not want the card to be renewed automatically, the setting must be changed to:
{
"renewAutomatically": false
}When automatic renewal is enabled, the renewal process can be initiated once the card enters the renewal period. The renewed card is issued using the applicable renewal configuration, including the delivery details associated with the existing card.
Renewal Period and AwaitingRenewal Status
A card becomes eligible for renewal when it reaches the AwaitingRenewal status.
This status indicates that a replacement card can be issued by creating a new card application and specifying the existing card as the predecessor using:
predecessor_card_id
The card enters AwaitingRenewal a defined number of days before its expiration date. Currently, this period is 30 days before expiration.
For example, if a card expires in 12/24, it will normally enter the AwaitingRenewal status during 11/24.
The AwaitingRenewal status does not mean that the existing card has expired. The current card remains usable until its expiration date (status: Expired), subject to its status, limits, and other applicable restrictions.
Check the Current Renewal Setting
The current renewal configuration can be retrieved using the Get Card Details API.
Check the renewAutomatically field in the response:
true— automatic card renewal is enabled.false— automatic card renewal is disabled.
Example:
{
  "renewAutomatically": true
}Note: Changing
renewAutomaticallyonly controls whether the automatic renewal process is enabled for the card. It does not renew the card immediately. Renewal becomes applicable when the card enters theAwaitingRenewalperiod.
Standard flow allows to call this Enable/Disable Card Renewal Settings API in statuses:
| Card Status | Standard Flow Allowed | Notes |
|---|---|---|
| Created | No | |
| Ordered | No | |
| Personalised | No | Not applicable for Virtual cards |
| Dispatched | No | Not applicable for Virtual cards |
| Active | Yes | |
| Awaiting renewal | No | |
| Blocked | Yes | |
| Closing | No | |
| Closed | No | |
| Expired | No |
Update card delivery address (only for ChipAndPin card)
To be Updated. Update card delivery address (only for ChipAndPin card)
Standard flow allows to call this Update card delivery address (only for ChipAndPin card) API in statuses:
| Card Status | Standard Flow Allowed | Notes |
|---|---|---|
| Created | No | |
| Ordered | No | |
| Personalised | No | Not applicable for Virtual cards |
| Dispatched | No | Not applicable for Virtual cards |
| Active | Yes | |
| Awaiting renewal | No | |
| Blocked | Yes | |
| Closing | No | |
| Closed | No | |
| Expired | No |
Replace Card
The Replace Card API allowes to reorder new card in order to replace existing card.
Typical reasons when to execute such request:
- Card was not delivered: If card delivery failed, and card was never delivered to the recipient.
- Lost or Stolen Card: If a physical card is lost or stolen, it is blocked immediately to prevent unauthorized transactions. A replacement card is issued with a new card number (FPAN) and a new CVV to maintain security
- Compromised Card Details: If card data is suspected of being exposed or leaked (e.g., used on a fraudulent website or caught in a merchant data breach)
- Unauthorised/Fraudulent Transactions: Active fraud detected on the card triggers an immediate token deletion, card block, and reissue
- Damaged Card: Physical damage to the card’s EMV chip, magnetic stripe, or antenna that prevents successful POS terminal contact or contactless payments
Replace Card API body request allows to change shipping address:
- Address must be provided only if it is needed to be changed.
{
"deliveryAddress": {
"addressLine1": "string",
"addressLine2": "string",
"postcode": "string",
"city": "string",
"deliveryDispatchMethod": "Express",
"countryCode": "str",
"phoneNo": "string"
}
}Response details return Newly created Card ID {“cardId”}, and Original Card {“predecessorCardId”}. This relationship is critical to link cards on partner system to the same card holder.
{
"predecessorCardId": "3fa85f64-5717-4562-b3fc-2c963f66afa6",
"cardId": "3fa85f64-5717-4562-b3fc-2c963f66afa6"
}Replaced card :
- Has new Card details, like Card number, Security CVV code
- Is linked to the same Card Holder
- Is linked to the same account
- Replaced Card tokenization maintains the same token for Apple interface.
Standard flow only allowed in statuses:
- To be Updated.
Google / Apple Push Provisioning
Google Wallet Push Provisioning
Google Wallet Push Provisioning allows a cardholder to add an issued ConnectPay card directly to Google Wallet from the BaaS partner’s mobile application.
The implementation consists of two parts:
- Google Pay program and mobile application setup
- Push Provisioning API integration
Google Pay Program Setup
Before Push Provisioning can be enabled, the BaaS partner must complete the required Google Pay issuer onboarding.
- Access Google Issuer Console
Access the Google Issuer Console using a corporate email address associated with a Google Account.During registration, provide the required business details and select Financial Institution as the business type. - Create the Business / Payments Profile
Create the required Google payments profile using the company’s legal business information and address.
Where requested during this setup, use:Merchant Category Code: Others (0000) - Provide Issuer Details
In the Push Provisioning API section of the Google Issuer Console:- accept the applicable Google API Terms of Service;provide the required issuer/company information;provide details of the authorized company signatory.
- Enable Access to Push Provisioning Documentation
Once the required agreements have been completed, Google provides access to the Push Provisioning API documentation. Ensure that integration with the Push Provisioning API is completed within six months of launching Google Pay, as stipulated in the CTA.
Additional team members can be granted access using their corporate email addresses associated with Google Accounts. - Whitelist the Mobile Application
The BaaS partner’s mobile application must be whitelisted by Google before in-app Push Provisioning can be used.
Provide Google whitelist information by communication through Google Form to whitelist application:- Android application package name; SHA-256 signing certificate fingerprint.
- Enable In-App Tokenization
In-app tokenization must also be enabled for the applicable card program on the Token Service Provider / Visa side.
ConnectPay will coordinate the required card-program configuration with the card issuer. Additional partner information may be requested during this setup.
Push Provisioning API Integration
After the Google Pay program configuration and application whitelisting are completed, the partner can implement the Push Provisioning flow.
Use the Push Provision Google Pay API:
ConnectPay manages that integration through the BaaS API: Push Provision Google Pay
Integration Flow
- The cardholder selects Add to Google Pay in the partner’s mobile application.
- Google Wallet starts the provisioning process and provides a
serverSessionId. - The partner backend sends the selected
cardIdand the receivedserverSessionIdto the ConnectPay Push Provision Google Pay API. - ConnectPay communicates with the card issuing/tokenization infrastructure and generates the encrypted provisioning payload required by Google.
- ConnectPay returns the
opaquePaymentCard. - The partner passes the returned
opaquePaymentCardto the Google Wallet Push Provisioning flow without modification. - Google Wallet continues the tokenization process and returns the final provisioning result to the cardholder.
Conceptually:
Cardholder selects Add to Google Pay
        │
        ▼
Google Wallet
        │
        │ serverSessionId
        ▼
Partner Application / Backend
        │
        │ cardId + serverSessionId
        ▼
ConnectPay Push Provision Google Pay API
        │
        ▼
Card Issuer / Token Service Provider
        │
        ▼
opaquePaymentCard
        │
        ▼
Partner Application
        │
        ▼
Google Wallet
        │
        ▼
Card Tokenization CompletedWhat to Provide
| Parameter | Description |
|---|---|
cardId | ID of the ConnectPay card that the cardholder wants to add to Google Wallet. |
serverSessionId | Google Wallet provisioning session identifier received when the Add to Google Pay flow is initiated. The same value must be provided to ConnectPay when generating the provisioning payload. |
Request Example
{
  "serverSessionId": "8c36b04b-fd6e-4442-b837-a3dcafcfc5ff"
}The cardId is provided according to the API endpoint definition.
Response Example
{
  "opaquePaymentCard": "LS0tLS1CRUdJTiBQR1AgTUVTU0FHRS0tLS0t..."
}opaquePaymentCard contains the encrypted and signed card information prepared for Google Wallet provisioning.
Using the Response
The returned opaquePaymentCard must be passed to the Google Wallet provisioning flow without modification.
The partner application must not attempt to decrypt the payload or extract the PAN, expiration date, or other card information from it.
A successful response from the ConnectPay API confirms that the provisioning payload was successfully generated. It does not confirm that the card has already been successfully added to Google Wallet.
The provisioning process must still be completed successfully by Google Wallet on the cardholder’s device.
Testing
Google Wallet Push Provisioning cannot be tested using the ConnectPay Sandbox environment.
End-to-end testing must be performed in the Production Friends & Family testing stage using:
- production-enabled test users;
- production-issued test cards;
- a mobile application whitelisted by Google;
- a card program enabled for in-app tokenization.
Testing access and the required production configuration must therefore be coordinated with ConnectPay before starting Push Provisioning testing.
Standard flow allows to call this Push Provision Google Pay API in statuses:
| Card Status | Standard Flow Allowed | Notes |
|---|---|---|
| Created | No | |
| Ordered | No | |
| Personalised | No | Not applicable for Virtual cards |
| Dispatched | No | Not applicable for Virtual cards |
| Active | Yes | |
| Awaiting renewal | No | |
| Blocked | No | |
| Closing | No | |
| Closed | No | |
| Expired | No |
Apple Pay Push Provisioning
Development in progress